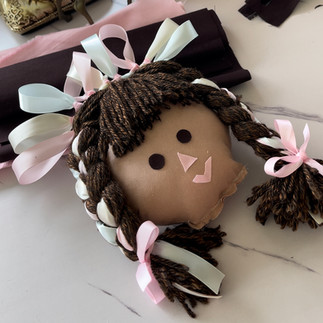
These dolls are called Lele Dolls in Mexico. The word Lele means “baby” in the Otomi dialect. This indigenous community started making these dolls in Queretaro, Mexico way back in the conquistadors' time.
Mainly, they were created to protect children from evil spirits. Now, they are part of the Mexican Cultural Heritage and the craftsmanship of the indigenous artisans is respected all over the world.
Today I’m honoring the Lele Doll and making a doll inspired by the beautiful Otomi craftsmanship and MYSELF. Which means pink and florals.
Supplies
These are all the supplies you are gonna need.

1 pack of doll needles
1 thread similar to the skin color of your doll - I used this one in Tan.
Yarn in the color of your doll's hair - I used this one in Sequoia
3 sets of 5/8'' ribbons in the colors you want the headband to be - I used white, pink, and blue.
0.5 yards of any fabric of your liking for the doll's skirt - I chose a floral one
1 yard of eyelet trim of about 2.5 in width for the doll's top.
1 yard of eyelet trim of about 1 in width for the skirt's trim
1 yard of cotton fabric in the doll's skin color of your choice - I used this one in Semolina.
0.5 yards of cotton fabric in the doll's eye's color - I used this one in Brown.
0.5 yard of cotton fabric for mouth and nose - I used this one in Dusty Rose.
Doll's template - You can download it here!
Instructions
Cut the paper template and draw it on the fabric.
Cut every piece from the fabric leaving enough space outside the line to saw. Do not cut right on the line.
Sew together every pair of legs, arms, body, and head leaving about a 1 in open for the poly-fil.
Turn every piece inside out.
Fill with poly-fill and close the opening.
Attach arms and legs to the body by hand with the doll's needle. You can close the neck.
Measure the waist of your doll to make the skirt. I made an A-line skirt with some pleats but you can make any type of skirt. For this skirt, start with the waist measurement and draw a long rectangle then slowly make the pleats following the waist measurement.
Saw the back of the skirt and sew the hem. Add thin eyelet trim.
Measure around the chest of the doll and cut wide eyelet trim accordingly. Saw the back and put on the doll like a normal top.
Repeat the last step but with the arms measure for the sleeves.
You can add a little ribbon or in rose on top for decoration. I used these roses.
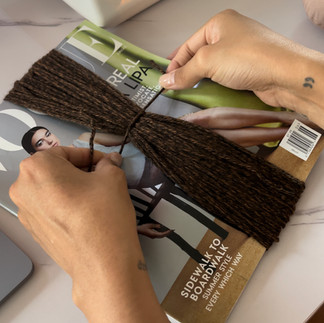
For the hair, wrap yarn around a magazine or a book of similar size. Wrap around 20-30 times, the more times you wrap the yarn, the more voluminous the hair of your doll will be.
Take a little piece of the thread and make a knot right at the center to keep the yarn together.
Turn the magazine around and cut right at the center. You will end up with something similar to a pair of pony tails.
If you want your doll to have bangs, repeat the same process but on a smaller item. I used my hand sanitizer.
Hot glue the bangs set and the hair. Use as much glue as possible so the hair stays along the head.
For the headband, I followed this tutorial on YouTube by the amazing Curiosidades Angela Peralta. I only made it smaller but followed the same technique.
Hot glue the headband on top of the doll's head and braid the remaining ribbon on the doll's hair.
Cut small circles on the fabric you are using for the eyes, and a little triangle and arrow shape on the fabric you are using for the mouth and nose.
Sew head to the body, I sewed mine on top of the neck for major support.
Your doll is ready!
Growing up among that blonde famous doll we all know, it was rare when I saw a doll on TV that looked like me. But that always changed when I was in the local market and saw these dolls for sale.
Artisans spend daaaaays sewing and decorating by hand, so naturally, this project took me a couple of days to complete. But I'm so happy with the result!

Happy Hispanic Heritage Month, amigos!

.png)


